Showing posts with label tutorial. Show all posts

Thursday, October 20, 2016

DIY Felt Black Cat Halloween Lights


I changed this summer wreath into a cute Halloween wreath with these black cat lights I made. You can make them too. It's easy and inexpensive.
First you'll need a few supplies:

1) One piece of Black Stiff Felt
2) Gold Metallic Acrylic paint. I used Deco Arts Champagne Gold.
3) Orange Mini Lights
4) A pair of Scissors
5) Black Cat Pattern


After you have all your supplies, you'll want to download & print out the black cat pattern.

A) Cut the cat shape out of your printout.
B) Using a pencil, trace the cat shape onto your black felt. You'll need ten cats.
C) Use a pair of sharp scissors to cut the cats out of your felt.
D) Paint the face onto the felt using a pretty metallic acrylic paint.
E) After the paint has dried. Use the sharp edge of your scissors to punch a small hole for the light to pop through.
F) Push a light through each hole for the eyes.
G) Hang your cat lights on a wreath, fireplace mantel, or any where you'd like to add some Halloween fun.


Tuesday, January 21, 2014

DIY pom-pom heart Banner

I used our DIY Wooden Hearts  to make this pom-pom banner for Valentine's Day. 
They come in a set of 10, but I only used 5.

1) Using an acrylic paint (I used DecoArt), paint a base color.

2) Use a glue gun to adhere pink, red, and white pom-poms until each heart is covered.


3) Use a twine to string the hearts on, hang, & enjoy!
Super easy to make!


Friday, December 20, 2013

DIY Wooden New Years Eve Banner Tutorial

 Christmas is less than one week away. Which means New Years is less than 2 weeks away. I don't have very many New Years Eve decorations, so I decided to add this Sparkly Happy New Year Banner to my small collection.
 First I started with this DIY Wooden Happy New Year Banner Kit from Say Hello.
Other supplies you'll need include:
Paint, Glitter, Modge Podge, hairspray, a foam paint brush, and a string to hang the banner from.
For my paint, I used The Champagne Gold color from DecoArt®. It's my favorite paint color ever, and I think it makes a great base color for this project. Of course you can always choose another color. Black, Silver, or Mulit-Colors would look great for this New Years banner.


I painted one thin coat of paint on each letter. It looked nice. You could leave the glitter out if you like a smooth finish, but I wanted to add glitter to my banner.

Next I added a thick layer of Modge Podge to each letter. Then I dumped a generous amount of glitter on top of the still well modge podge. I did one letter at a time, so that the modge podge would stay nice and wet. After dumping the excess glitter back into my glitter stash, I used some hairspray to spray each letter to keep the glitter in place.

 Next, I put some modge podge into a separate bowl. Using my sponge brush I dapped a generous amount of modge pode to each letter. Do not rub, just dab. Don't worry about your letters turning white, it will dry clear in about an hour. This step prevents the glitter from falling off and making a mess. While you wait for the Modge Podge to dry, use a toothpick or tip of a safety pin to poke through each hole and clear out the gunk. This will make threading your twine through each letter easier.

 Lastly, I measured my area where I wanted to hang my banner and cut some bakers twine to fit the measurements. The letters were easy to slide onto the twine. I used some clear 3m hooks that I found at Target to hang my banner to my fireplace mantel.

Step back and enjoy your banner! Happy New Year!

Wednesday, November 6, 2013

DIY Felt Snowflake banner Tutorial & Pattern

I'm re-posting my most popular tutorial from almost 5 years ago. Somehow between all those years, all our moves, and all our computer crashes, the downloadable file was damaged.
So, by popular request, I've recreated it for you to download. FREE!

I'm not going to lie. It takes a long time to cut out all these snowflakes. But it's worth it. This banner is also very inexpensive to make.


You will need some "Stiff Felt" in white or your desired color, some Ric-rac or ribbon, sharp scissors, a hot glue gun, sequins, or any fun embellishments you might have. 

1) CLICK HERE to Download and print this 2 page PDF file.
This will be the pattern for your snowflakes.
2) Cut out the paper snowflakes for a pattern.
3) Trace Pattern onto some stiff felt.
4) Cut snowflakes out of stiff felt.
5) Use a hot glue gun to glue sequins or embellishments to the center of each snowflake.
6) Glue each snowflake to ric rac or ribbon to make your snowflake garland.
7) Find a fun place to hang your garland and enjoy!

Note, snowflakes take a little time to cut out. I like to cut them while watching my favorite movie.
Please feel free to share my pictures and this tutorial with your friends. Please direct them to this website to download the snowflake patterns, as the pattern is not intended for
re-distribution or re-sell. Thanks!


This is me way back when, showing my snowflake banner on Studio 5.


Tuesday, October 15, 2013

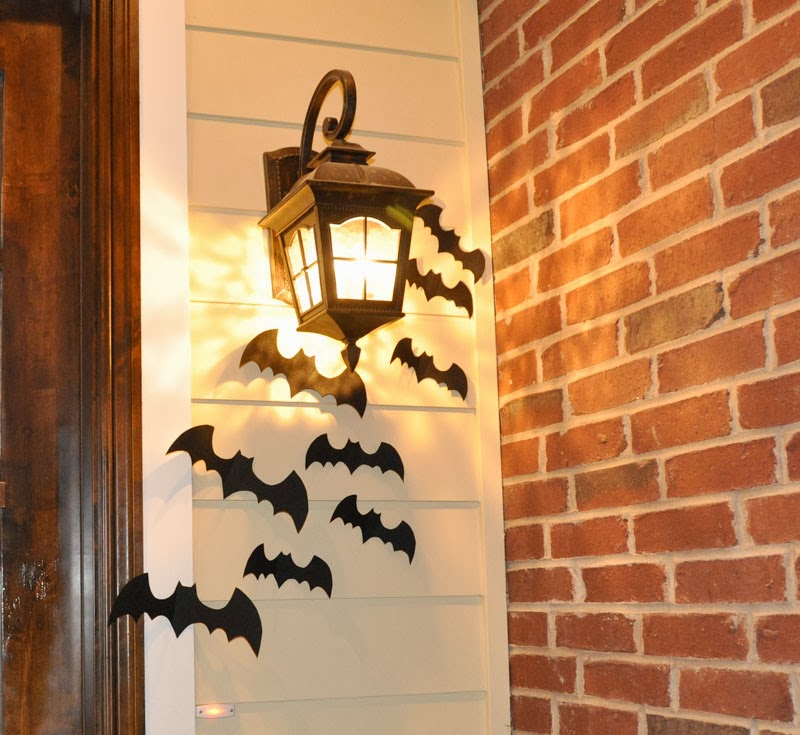
Halloween Bat Tutorial & Pattern


I made these bats a few years ago on my old blog. They were pretty popular, so I thought I'd add them on this blog too. These are super easy and inexpensive to make.

1) Click HERE to download my PDF bat pattern.
2) Print Pattern.
3) Cut out pattern and trace bats onto black stiff felt, or black card-stock.
4) Cut bats from felt or card-stock.
5) Glue a square piece of paper or card-stock to the back of the bat. This will make hanging the bats using masking tape easier.
6) hang from mantel, ceiling, stair railings, & etc. (I used masking tape to adhere the bats to my wall and fireplace mantel.
7) Optional: I folded each side of the bat to the center to make them look like they are flying.


Thursday, May 9, 2013

Instructions for making Paper Flower-Flakes


I'm headed to Studio 5 tomorrow to show how to make these 3-D paper Flower-flakes. They would look lovely as a surprise on your Mother's front door for Mother's Day. They would also make fabulous party decorations. If you can make a traditional six sided snowflake, you can easily make these flowers. Just follow the steps below.

Step 1- Start with an 8.5" x 11" sheet of paper (non-card-stock). Fold one corner of the piece of paper down. Cut off the bottom portion to make a triangle. When using larger butcher paper, start by cutting it into a square, then fold it in half.
Step 2- Temporarily bring the two corners of the base of the triangle together to find the center point of the longest side. Make a small crease at the center point.
Step 3- Use the center point to divide the triangle into three equal parts. Fold the right corner in at a 60° angle. Then fold the left corner in back at a 60° angle.
Step 4- Fold the paper in half.
Step 5- Cut the upper portion along the horizontal line. Round the edges as shown below for a floral look.

Step 6- Use scissors to cut some designs into your flower. See below for some ideas.

Step 7- Carefully unfold your flower and flatten it out with your fingers. Use an iron for base flowers. Leave the smaller flowers for layering with folds in it for more dimension.

Step 8- Use a glue gun to adhere the smaller flower to the larger base flower.


Step 9- With a round circle punch, punch some centers for the flowers. You can cut circles if you don’t have a circle punch. Adhere them to the center of the flower using a hot glue gun.


Step 10- Make leaves by folding a piece of paper in half, and cutting out a half leaf.


Step 11- Use tacky putty to adhere flowers to doors, walls, & etc.

Have fun experimenting with different designs and see what you come up with.  Use jewels, glitter, & sequins to make the centers pop. Play with color combinations & sizes. The possibilities are endless.


Tips-
• Using hot glue, layer smaller flowers on top of larger flowers to add dimension.
• Use a roll of butcher paper to make a larger flower.
• Add glitter or patterned paper to add pizzazz in the center of the flowers.
• Iron the flowers or leave them folded for different effects.
• Use thin paper. Cardstock is too thick to cut when folded many times.
• Use tacky putty to safely adhere flowers to your Mother’s door to brighten her day.
• Flowers also make great decorations for birthday parties and photo-shoot backdrops.