Showing posts with label cute. Show all posts

Thursday, October 20, 2016

DIY Felt Black Cat Halloween Lights


I changed this summer wreath into a cute Halloween wreath with these black cat lights I made. You can make them too. It's easy and inexpensive.
First you'll need a few supplies:

1) One piece of Black Stiff Felt
2) Gold Metallic Acrylic paint. I used Deco Arts Champagne Gold.
3) Orange Mini Lights
4) A pair of Scissors
5) Black Cat Pattern


After you have all your supplies, you'll want to download & print out the black cat pattern.

A) Cut the cat shape out of your printout.
B) Using a pencil, trace the cat shape onto your black felt. You'll need ten cats.
C) Use a pair of sharp scissors to cut the cats out of your felt.
D) Paint the face onto the felt using a pretty metallic acrylic paint.
E) After the paint has dried. Use the sharp edge of your scissors to punch a small hole for the light to pop through.
F) Push a light through each hole for the eyes.
G) Hang your cat lights on a wreath, fireplace mantel, or any where you'd like to add some Halloween fun.


Thursday, March 27, 2014

Easter Egg Hunt Invitation Printable


Cute, free printable Neighborhood Easter Egg Hunt Invitation

Head over to Snap Creativity to download my Free Easter Egg Hunt Printable for your Spring Celebration this year.

Friday, March 7, 2014

Tuesday, January 21, 2014

DIY pom-pom heart Banner

I used our DIY Wooden Hearts  to make this pom-pom banner for Valentine's Day. 
They come in a set of 10, but I only used 5.

1) Using an acrylic paint (I used DecoArt), paint a base color.

2) Use a glue gun to adhere pink, red, and white pom-poms until each heart is covered.


3) Use a twine to string the hearts on, hang, & enjoy!
Super easy to make!


Thursday, December 12, 2013

Free Christmas Gift Tags Printable

I can't believe Christmas is less than 2 weeks away. I created this cute kids gift tag printable to help you keep track which gift under the tree is for which kid. You could also use these gift tags for neighbor or co-worker gifts. Best of all, you can download and print them today for FREE!
CLICK HERE to start downloading PDF file.

 
Print them onto card-stock or sticker paper from home, or take the file into your favorite local printer such as Office Max or Staples to have them printed.

For personal use only. Please do not re-distribute or sell these tags or the images on the tags.
Thank you! ©2011 Holly Brooke Jones.

Monday, November 25, 2013

Stinkin' Cute Thanksgiving kids table setting

These customizable kids place settings are now available at Zazzle. They would be cute for a kids Thanksgiving dinner place setting.Skunk Plate
Skunk Plate

Skunk Mug


Monday, November 11, 2013

Holiday Snowman Candle Craft

My sister saw these cute snowmen made out of glove fingers in a magazine.
My mom, sister, and I decided to make some, glue them to the top of Holiday scented candles and donate them to the Festival of Tree's gift shop this year.
They were easy to make & super fun! We made 60 of them.

I think they would make a great neighbor or co-worker gift.


Thursday, September 12, 2013

Custom Thanksgiving Dinner Invitations

It's a bit early to start planning for Thanksgiving Dinner, but I just designed these custom printable Invitations last night. I wanted an invitation that was simple but cute using light Autumn colors.

Wednesday, August 14, 2013

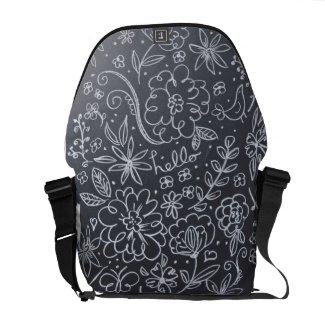
Back to School Chalkboard Backpack

Chalkboard Floral back pack
Chalkboard Floral back pack by sweetlittlebling
I can't believe it's back to school time already. My kids started back to school two and a half weeks ago. Check out my floral chalkboard inspired backpack that's available on Zazzle.

Thursday, August 8, 2013

Customized Bridal Shower Inviation & matching postage

CLICK HERE to find Squirrel Postage

My "Falling" in Love Bridal Shower & matching postage is now available over at Zazzle. You can customize the text for your event. You can even customize the paper it's printed on. Great for an Autumn wedding or bridal shower. 


CLICK HERE to find Invitation

 
Shop sitewide and get FREE standard shipping. Hurry, deal ends today! USE CODE: FREESTNDSHIP

Thursday, July 11, 2013

Using DecoArt Paint to customise Say Hello Products

Did you know that most of our Say Hello products are customizable? Although the plain look is nice, sometimes it's fun to add color and design to make our products fit your space.

The team at Deco Art sent us a photo of this clock. They used their paint products to created a customized robot clock for a little boys room.


Thursday, July 4, 2013

Happy 4th of July Instagram button


I hope you all have a fantastic 4th of July.

Use your phone to download the button above. (on the iphone hold your finger to the button above until a list of options pops up. Save to photo-feed. Feel free to post it to Instagram, Facebook, or other social media.

 Hashtag #sayhelloshop or @sayhelloshop is appreciated but not required.

Wednesday, June 19, 2013

Illustration Friday: Worn

Here's my drawing for Illustration Friday
Worn from riding horses all day.
You can purchase a downloadable file HERE to print for your horse loving daughter's bedroom.

Tuesday, June 11, 2013

Girl with a pug illustration


I drew this picture for my daughter who loves her little toy pug whom she named "Chocolate Chippy." I'm going to have it printed at Office Max and frame it for her room. It also fit nicely with Illustration Friday's theme: Children.

Thursday, May 9, 2013

Instructions for making Paper Flower-Flakes


I'm headed to Studio 5 tomorrow to show how to make these 3-D paper Flower-flakes. They would look lovely as a surprise on your Mother's front door for Mother's Day. They would also make fabulous party decorations. If you can make a traditional six sided snowflake, you can easily make these flowers. Just follow the steps below.

Step 1- Start with an 8.5" x 11" sheet of paper (non-card-stock). Fold one corner of the piece of paper down. Cut off the bottom portion to make a triangle. When using larger butcher paper, start by cutting it into a square, then fold it in half.
Step 2- Temporarily bring the two corners of the base of the triangle together to find the center point of the longest side. Make a small crease at the center point.
Step 3- Use the center point to divide the triangle into three equal parts. Fold the right corner in at a 60° angle. Then fold the left corner in back at a 60° angle.
Step 4- Fold the paper in half.
Step 5- Cut the upper portion along the horizontal line. Round the edges as shown below for a floral look.

Step 6- Use scissors to cut some designs into your flower. See below for some ideas.

Step 7- Carefully unfold your flower and flatten it out with your fingers. Use an iron for base flowers. Leave the smaller flowers for layering with folds in it for more dimension.

Step 8- Use a glue gun to adhere the smaller flower to the larger base flower.


Step 9- With a round circle punch, punch some centers for the flowers. You can cut circles if you don’t have a circle punch. Adhere them to the center of the flower using a hot glue gun.


Step 10- Make leaves by folding a piece of paper in half, and cutting out a half leaf.


Step 11- Use tacky putty to adhere flowers to doors, walls, & etc.

Have fun experimenting with different designs and see what you come up with.  Use jewels, glitter, & sequins to make the centers pop. Play with color combinations & sizes. The possibilities are endless.


Tips-
• Using hot glue, layer smaller flowers on top of larger flowers to add dimension.
• Use a roll of butcher paper to make a larger flower.
• Add glitter or patterned paper to add pizzazz in the center of the flowers.
• Iron the flowers or leave them folded for different effects.
• Use thin paper. Cardstock is too thick to cut when folded many times.
• Use tacky putty to safely adhere flowers to your Mother’s door to brighten her day.
• Flowers also make great decorations for birthday parties and photo-shoot backdrops.

Monday, March 4, 2013

Free Chalkboard Art PDF Download


Please enjoy this free 8.5 x 11" PDF Chalkboard Art printable download. "Even stars need darkness to Shine." Click on the link above to start your download.

* ©2013 Holly Brooke Jones. For personal use only, please do not redistribute without permission. You may use the image above when linking to this blog. Thank you!

Friday, February 15, 2013